BIA Operation
Before beginning a BIA, ensure that the BIA Setup has been completed to the organisation's requirements.
Identify Products, Services and Activities
The first steps of a BIA are to identifyOnce the above steps have been completed, the activity workflow can be followed, as described below.
Activity BIA
Abriska guides the users through an organisational defined workflow that meets the requirements of ISO 22301. The buttons available on the sidebar will increase depending on the activity work stage. This page describes the various steps that are required to complete the workflow, in detail.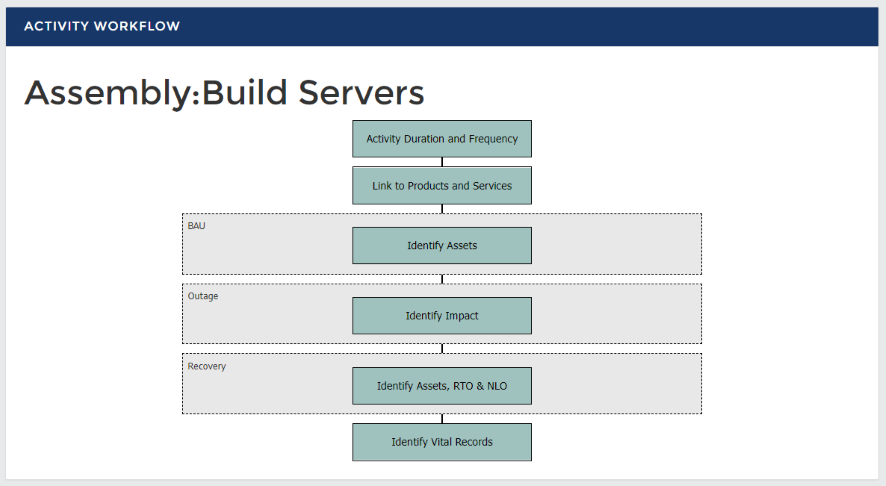
Activity duration, frequency and operating times
To capture information regarding the criticality of an activity, the operating hours, approximate duration and frequency should be entered. To add this information, click ‘Activity Duration and Frequency’ from the ‘Activity’ page.Link to products and services
For each product and service that is loaded into Abriska (regardless of the division), each activity needs to specify whether it is required to deliver that product. To add this information, click ‘Products and Services’ from the ‘Activity’ page.Activity inter-dependencies
An activity may rely on other activities for either data, or to complete its operational processes. These relationships need to be modelled within Abriska to understand what the recovery priority should be for each activity. To add this information, click ‘Identify Inter-dependencies’. The activity hierarchy will be shown and a checkbox will be visible next to each activity. When a checkbox is clicked, a further information panel will display which allows additional information to be entered about this relationship.Identify Assets' business as usual
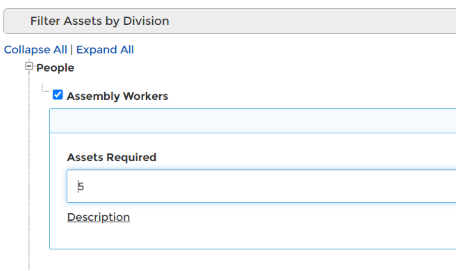
To understand what an activity requires for business as usual, each activity can be linked to organisation assets. To add this information, click into the named activity you'd like to work on > click on ‘Identify Assets’ within the BAU section. Displayed is the asset hierarchy. Each asset with a checkbox allows the asset to be selected as “required for business as usual”.Abriska allows assets to be set up as ‘multiple’, by selecting 'yes' will mean that when activities specify they use this asset, they will need to indicate how many assets they use. To select multiple go to > Assets > asset name > BC Details tab > select 'yes' on Multiple > Submit
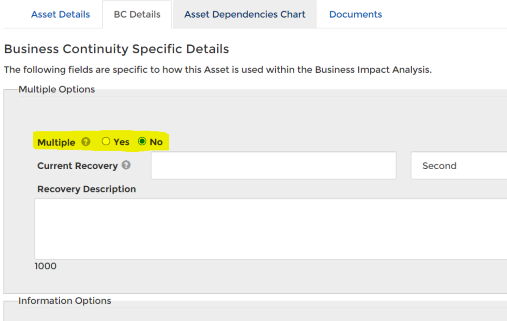
If this flag is set, a textbox will be displayed to enter the amount of assets required by this activity.
Enable Assets at the Division Level functionality
With this feature, the division will show as an activity and its assets linked.This feature needs to be turned on by URM support (please email support@urmconsulting.com).
Identify impact over time and MTPD
The MTPD must be defined for each activity. Abriska satisfies this by specifying the impact over time for each activity. Abriska then uses the organisation’s threshold for each impact to determine this time period. Each of the impacts that were specified at the organisation level need to be quantified against the timescale that was specified at the division level.To edit the profile of a specific impact, click ‘Identify Impacts’ from the ‘Activity’ page and click on the impact name. The timescale will be specific to this division and the impact level will be specific to this impact. For each timescale, specify what the impact would be. For example, if the reputational impact is moderate after 4 days then select the radio button labelled with that time period.
From the ‘Activity BIA’ page, click on ‘Identify MTPD’ under 'OUTAGE'. If none of the impacts reach the threshold within the timescale, the MTPD will need to be manually entered.
When entering the MTPD, it must be larger than the greatest impact time. This is required to enforce the impact threshold logic.
Identify recovery assets, RPO and RTO
ISO 22301 requires that an organisation: “identifying dependencies and supporting assets for these activities, including suppliers, outsource partners and other relevant interested parties.” Recovery assets are entered in a similar way to business as usual assets, although there is the addition of the division’s timescale. To add this information, click ‘Identify Assets’ from the ‘Activity’ page. Initially, Abriska shows all assets that are used within BAU (the BAU requirement is visible in the far left column) and an input box is available for each time period. Enter the required number of assets for the timescale unit determining how the asset will vary over time.If the amount of assets exceeds the total number required for business as usual, the input box will be highlighted red, although this does not stop a value being entered. One possible reason for entering more required assets during a recovery than the business as usual amount is that there may be the need to recover from a backlog.
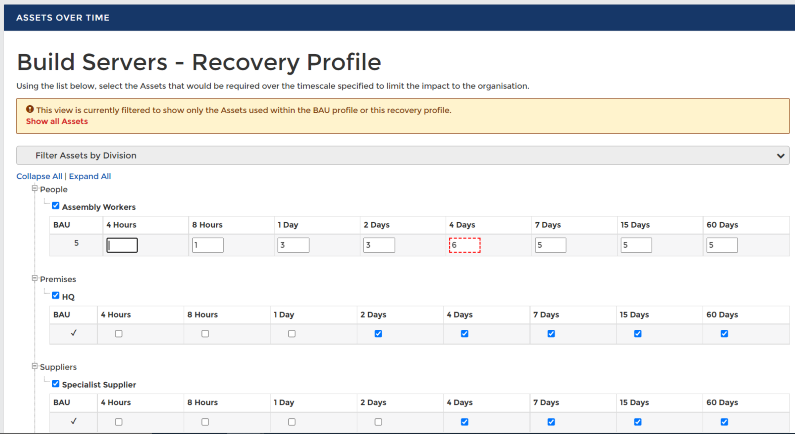
If assets are not used for business as usual, but are required for a recovery period, then select the checkbox next to that asset and enter the recovery over time requirements.
If any of the selected assets have been set up as ‘RPO required’ then additional information will display within the asset BC details section within Organisation> Assets. This allows the data recovery requirements to be entered. Enter the amount that could be lost from this system but still allow the activity to operate.
Once all of the recovery assets have been entered, the next stage is to identify the recovery time objective (RTO). To add this information, click ‘Identify RTO’ from the ‘Activity’ page. Complete the fields of the ‘RTO’ form and press ‘Submit’ to save. As the RTO of the activity may change over time, the history of how this variable has changed is available from the ‘RTO History’ tab.
Identify vital records
The final stage of the activity BIA is to enter any vital records that are required for this activity to be operational. Examples include operational manuals that do not exist in electronic format or specialist forms/cheques.If the activity does not require any vital records then click ‘Vital Records’ from the ‘Activity’ page and click ‘Confirm No Vital Records Exist’. Alternatively enter the vital records adding the location of the record and selecting salvage flag (this indicates that this record would need to be replicated to any recovery location).
Back to Business Impact Analysis