System Setup
Organisation Logo
You can upload your organisation logo here, and it will display in the top left of every page whenever anyone is logged into your organisation. This also applies to suppliers when answering a questionnaire.- Maximum file size: 1MB
- Allowed file types: JPEG, PNG
The logo may take 5 minutes to appear after upload. Please refresh your browser or log out and back in if it does not appear after this time.
Dashboard Setup
The home dashboard can be configured to display chosen widgets of summary information. You can learn more at Widgets Explained.If you would like to see widgets or summary information on the home dashboard, please reach out to support@urmconsulting.com.
Password Complexity
Define the rules for user passwords and set when passwords can be changed or reused.If sing sign on (SSO) is employed this will only be available for org admins. To set up SSO please contact support@urmconsulting.com.
Notification Setup
Allows the setting of time-based reminders and flags that will appear throughout Abriska. These notifications can relate to the need to revise documents, unresolved actions and overdue questionnaires or review risks.Users can choose which notifications to turn on. Notifications are shared every Monday via email. Org Admins can select which notifications are set by permission level, however further filtering can be done per user in contact details.
The colours per notification can also be edited by creating new 'Custom Colours' found on the left panel. Once the new colour has been created, it will show in a dropdown column on the main notifications setup page.
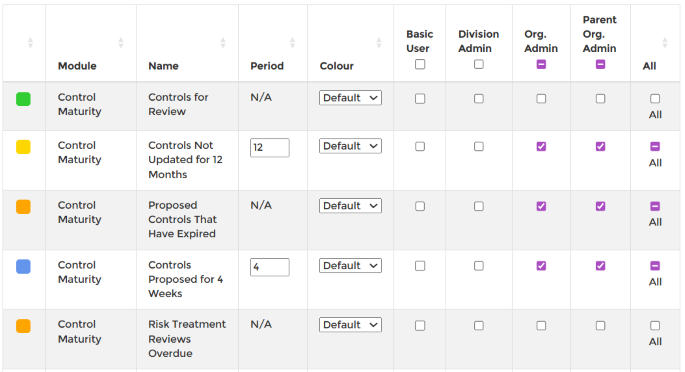
Notification Setup
Login Settings
Users can set up a login message, inactivity timeout periods and MFA settings. Org admins can turn on MFA for the whole organisation and determine the MFA validity period, e.g save the IP address for 30 days before requiring to go through MFA again. For details on MFA setup per user please see MFA Setup.A login message can be displayed to all users whenever they log into Abriska.
Library References
Provides the ability to introduce any common glossary into Abriska to ensure consistency of data entry and facilitate comparison across the organisation. The information appears as on-screen guidance for users. Existing terminology can be changed and descriptions used within Abriska. If some terms are not listed that you would like to change, please contact support@urmconsulting.com.Custom Data Fields
For each supplier or asset (resource), additional information can be held within Abriska. New fields can be created here and will automatically appear against all assets. New data fields can be free text or a selection, which will appear as a dropdown.The example below for a supplier, displays tier dropdown selections and a free text box. for further advise or support on using this function please contact support@urmconsulting.com.
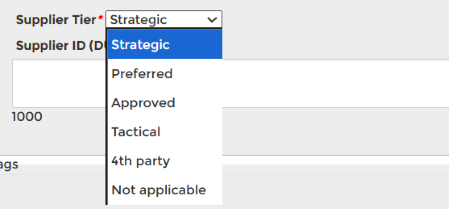
Example custom fields
User Role Access
Restrict access of specific features to different user permission levels. This will override Abriska's default permissions. For example, the enterprise risk register (Abriska 31000) has three features that can be restricted: Identify and Analyse risks, Archive Risks, and Identify Risks. For further details on these features, see Using the Enterprise Risk Register.To edit the permission level access, move the toggle from 'Default' to 'Custom'. This will reveal the permission levels to tick for access.
System Messages
Change the content of emails and other messages generated by Abriska. There three automated emails that can be edited:- New Username Email - when a new user is created, or a username is changed.
- New Password Email - when a new password is generated, or setup (by an org admin)
- Password Reset Email - when a user requests a password reset link.
System Appearance
Customise the application's colour scheme. Users can change the colour theme within Abriska to reflect the organisation colour theme and logo.The form allows you to customise the colours of the:
- Top Bar
- Menu Primary and Secondary
- Heading
- Return button
- Submit button
- Confirm button
- Workflow
To change the colour, untick 'Default' and click on the 'Colour Hex Code' box for the named area you wish to change > double click on the colour chart to select a different shade or move the arrows up and down to select a new colour.
Once you have chosen the colour you like, click on the multicoloured circle in the bottom righthand corner of the black box to confirm your selection.
Ensure to click 'Submit' on the left side bar and enjoy the new colour theme on your Abriska account.
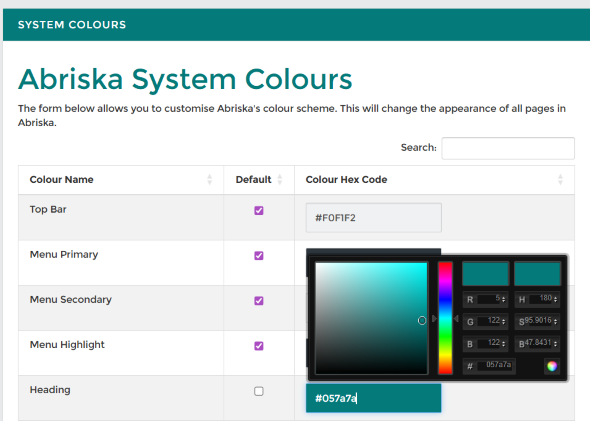
System colour change example
System Variables
Alter how data is displayed within Abriska. For example the table display default is 10 rows, this can be altered to 15 or 20 rows.Back to Organisation Setup