Supplier Command Centre
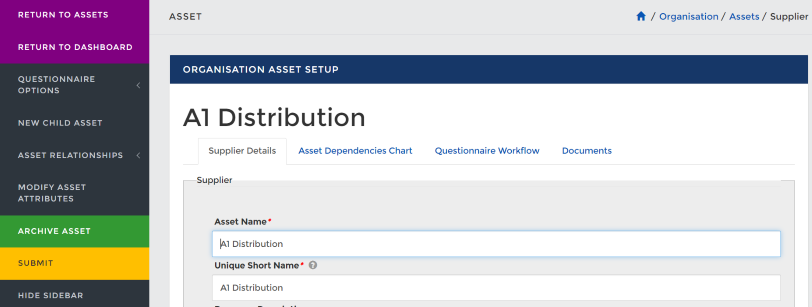
Supplier Asset Setup/ Supplier Details
Here you can edit supplier details, relationship owners, modify attributes and create and review questionnaires.
You can get here from: A) Assets > Suppliers (asset type) > select supplier name,
B) Supplier Dashboard > go to edit (pencil symbol over supplier name)
When initially creating a supplier there are two options of how to assess them: Questionnaire-based assessment, which is the default, or a Manual assessment.
Manually assessed suppliers require the asset attributes to be assessed and then are assessed directly based on evidence you have. For example Microsoft are highly unlikely to complete a questionnaire and a lot fo the information you require is available on their website, you then decide based on this evidence if they are a negligible, low, medium or high risk supplier. For step by step instructions see Manually assessed suppliers.
On the left hand options bar; 1. 'Questionnaire Options' - here you can select which categories your supplier relates to, nominate the primary contact and view which emails you have sent and view all questionnaires - completed and uncompleted.
2. 'Asset Relationships' - here you can select whether your supplier has access to any of your assets/resources. The supplier may be dependent on another supplier with which the organisation holds a direct relationship, or it may support another supplier or asset/resource.
3. 'Modify Asset Attributes' - identifying a score for the Confidentiality, Integrity and Availability - the impact this supplier can have on your organisation.
On the four tabs in the centre of the page;
1. 'Supplier Details' - basic asset/resource information where you can assign an owner, its location and their tier.
2. 'Asset Dependencies Chart' - chart view of the 'Asset Relationships'.
3. 'Documents' - relevant documentation, polices are able to be uploaded.
4. 'Questionnaire Workflow' - here you can manage sending questionnaires to suppliers.
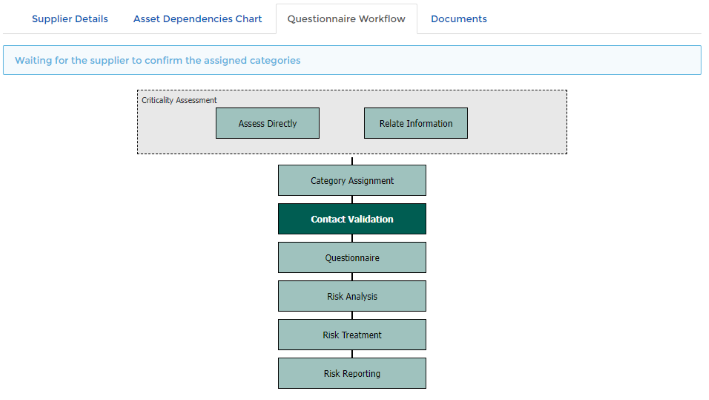
Questionnaire Workflow
To send a questionnaire to a supplier you need to go through the workflow process, flowing the steps outlined below. This is a key area within Abriska and most users will use this workflow to drive their supplier risk assessment activities from initiation through to completion of each assessment cycle.Criticality Assessment
Two options are available:
- Assess Directly
- Relate Information
Assess Directly requires the supplier risk profile to be determined individually whereas Relate Information implies that the risk profile is being inherited from another resource or supplier.
Selecting ‘Relate Information’ will prompt completion of the dependency information.
Assess Directly prompts completion of the Confidentiality, Integrity and Availability (CIA) attributes of the commodity or service that the supplier provides.
Under each of the Confidentiality, Integrity and Availability attributes, there is an impact statement ranging from Minor (1) to Major (3) along with a justification field (optional). Note that the range of impact levels can be extended to fit with the risk/impact matrices used within the client organisation. Contact URM Support for more information.
Once the attributes have been completed, select ‘Submit’. The system returns to the 'Supplier Details' tab. Re-select 'Questionnaire Workflow' and it can be seen that 'Category Assignment' has now been highlighted as the next stage.
Category Assignment
Select 'Category Assignment'. A list of supplier Categories will be shown on the screen. The default list with Abriska contains 13 categories (should have these been requested during configuration, please speak with your account manager or support for these categories). Based on an understanding of the supplier, its product, service and delivery model relevant categories should be selected. Should you have created your own categories please note the supplier may see the description of these if you ask them to confirm the category assignment. The categories selected determine the questions to be asked. Complete this activity by selecting 'Submit'.
Contact Validation and Questionnaire
From the 'Questionnaire Workflow' tab, the next highlighted stage is ‘Contact Validation’, Enter the email address of the supplier contact. If the contact is not already registered, then they will receive an activation email informing them that they have been set up on Abriska and need to validate their registration to respond to the survey. When setting up the supplier contact, there are four workflows to consider.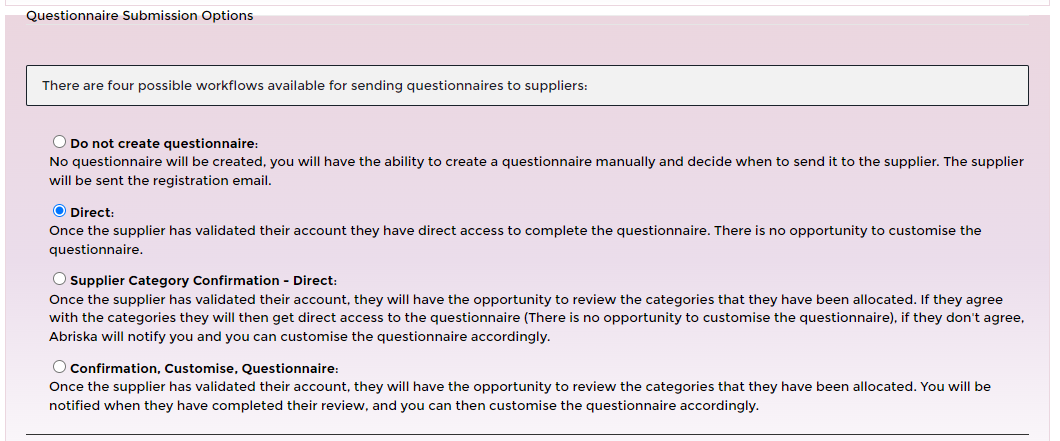
- 'Do not create questionnaire' - the supplier will create their account and you create the questionnaire manually at a time you decide to issue it to the supplier.
- ‘Direct’ – in this case once the supplier contact has validated their registration, then they proceed directly to responding to the questionnaire. They cannot amend the categories and therefore the questions sent to them.
- ‘Supplier Category Confirmation – Direct’ – in this option, the supplier contact has the opportunity to review the categories for relevance and confirm or reject the categories assigned by checking each category and providing justification where they believe a category does not apply to them. Should the supplier accept the categories the questionnaire will be released to them automatically to being responding it. Should the categories be rejected the relationship owner will be notified of this response and the questionnaire will need to be amended accordingly before being made available to the supplier again.
- ‘Confirmation, Customise, Questionnaire’ - the supplier validates their account, reviews the categories and then the user creates the questionnaire based on category confirmation.
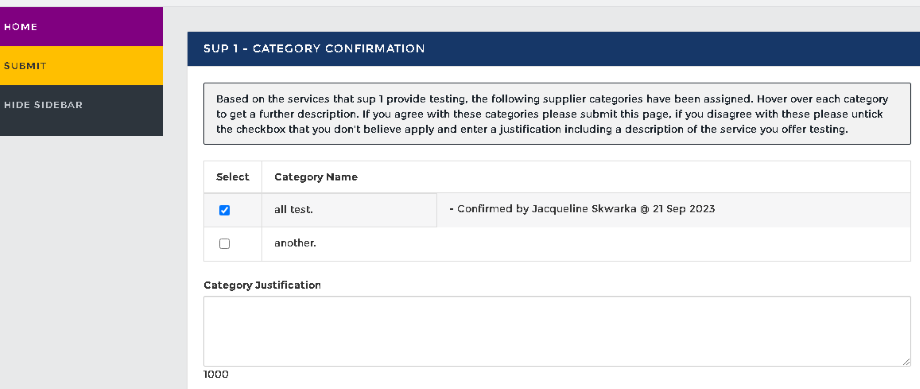 Supplier side view of category confirmation and justification
At this stage, internal notification options can be set based on the information held within the supplier profile. When ready, select ‘Submit’. The questionnaire is sent to the supplier.
Seeing the status of questionnaires
You can review progress of the questionnaire through the Dashboard > select the second to last option (mini list icon next to 'Risk') 'questionnaires' > this will take you directly to see a list of the questionnaires sent, in progress and completed. The history of questionnaires is also reviewable through this section.
There are also further options to 'Recall Questionnaire' should you have made a mistake, such as assigned the wrong categories, supplier contact etc. Should you need to make said changes, you will need to delete the questionnaire, make the changes to the categories (or whatever area you need to correct) and then create a new questionnaire. When a questionnaire is created that is how it will stay e.g. if control questions are changed after a questionnaire has been created, said questionnaire will not have these edits.
Risk Analysis
Analysing the answers to the most recent questionnaire; from the 'Questionnaire Workflow' tab, select ‘Risk Analysis’ and list of questions will appear from the most recent questionnaire.
To view questions from previous or other questionnaires go to > 'Questionnaire Options' > 'Questionnaires' > select the questionnaire you wish to view.
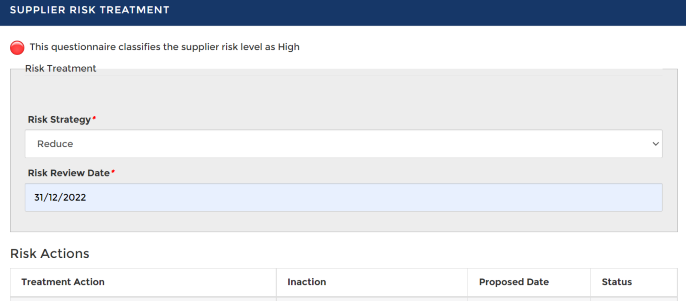
Risk Treatment
This is the supplier risk treatment strategy page. It will highlight to the user at what risk level the questionnaire classifies the supplier at. The user has the option the select a 'Risk Strategy' from a dropdown box to 'Accept', 'Reduce', 'Avoid' or 'Transfer'.You must select and 'Submit' a review date before submitting a 'Risk Action'. Where a control assessment is inadequate, 'Risk Actions' can be created for remediation activity. Actions can be created on internal staff or supplier contacts. Actions are raised and recorded against a questionnaire rather than a control area.
Risk Report
TBC
Return to Supplier Risk Management